 |
|
 01-03-2020, 06:15 PM
|
#101
|
|
10 Second Club / Meet Coordinator
Join Date: Dec 2004
Location: Roxbury, NJ
Posts: 2,118
|
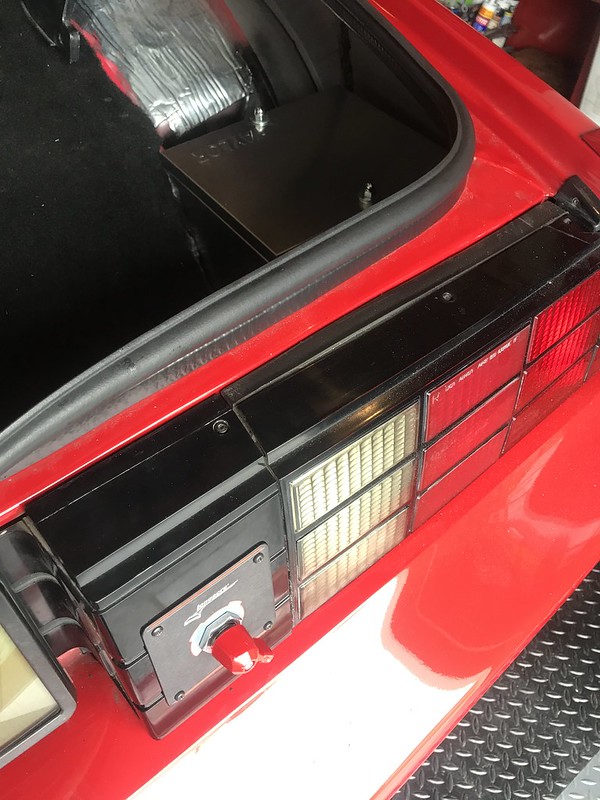
My Longacre 4 terminal switch arrived and I had some time to install it to test my wiring.
the switch (and my wiring) works!! car fires up, and when I flip the switch off, it kills everything instantly. AWESOME
switch works great. a very solid click when turned on/off. I tested voltage at many connection points and terminals. battery itself was 12.33 volts. I got pretty much that same exact number at every connection point...even up in the engine bay at the jump-post, I got 12.32 volts!!
Project complete



and a video
https://www.youtube.com/watch?v=3y9kT-HgKb8
https://youtu.be/3y9kT-HgKb8
next, I'll probably drive the car around a little bit just to enjoy a running engine for a few more miles. then, I'll switch focus to the engine bay, and begin removing what needs to come out.
I am still super bummed out about not being able to have the roll bar and seat-belt harness project done this winter. it will have to wait. the harnesses did arrive, and just to make myself more bummed out I laid them onto the seats just to get an idea of what it would look like. sad

also, I have to install the junction block/distribution block in the engine bay, and the 150 amp circuit breaker too. those just arrived yesterday.

__________________
1987 IROC-Z - modified

|

|

|
 01-03-2020, 07:32 PM
|
#102
|
Join Date: Nov 2007
Location: Jackson, NJ
Posts: 1,725
|
Install looks nice and clean, looking forward to more progress
__________________
1983 camaro- Scrap
1988 camaro- Also scrap
'05 Silverado- You guessed it, scrap
1988 TRX 250R- Ported w/ high compression on 110 octane- Out 60' your LT1
Jersey Shore Street Car Takeover (JSSCT) Founder
Quote:
Originally Posted by LS1ow

and once i get PHB, what do i ajust it too?
|
Quote:
Originally Posted by Jersey Mike

Seven.
|
|

|

|
 01-05-2020, 07:22 PM
|
#103
|
|
10 Second Club / Meet Coordinator
Join Date: Dec 2004
Location: Roxbury, NJ
Posts: 2,118
|
picked up the 3 ton engine hoist from my neighbor. I plan to take the old engine out with the trans attached to it.* if that proves too difficult, I will seperate them.* He also let me borrow a transmission jack too.*
Today I drove the car for one last time with this engine in it. it was mid 40 degrees here in NJ today.* The car ran rough, stalled while idling a few times, and SES light was on.* This engine has been in the car for 19 years and has had a lot of use/abuse. It has served me very well enough for a little 305 Gm replacement engine that was never ment to have 20-25 bottles of nitrous fed through it recent years. It is time for an upgrade, but it does feel sad to take a "running" engine out of the car and make the car inoperable for a short period of time.* luckily it is winter and I dont need to have the car road worthy for a few months.*
Then I parked it in the garage and removed the nitrous solenoids, nitrous wiring, nitrous lines,* evap canister and vacuum hoses, radiator, fans, trans cooler, etc.**


my magnetic trans fluid filter did have some metallic sludge on it, butt here is no way for me to tell if this was accumulate in the radiator's trans cooler from the previous transmission meltdown back in 2016. even though I did flush it out then, if you read some of the older posts in this thread, I had a piece of old trans debris get stuck in the valve body of the new trans from Dana at Probuilt automatics a few years ago. I then put in the magnetic trans fluid filter, but have never checked it or replaced it (until now).* I plan on getting a new aluminum (but on the more budget friendly $ spectrum) and hope that it and my B&M trans cooler will be clean and clear for years to come.
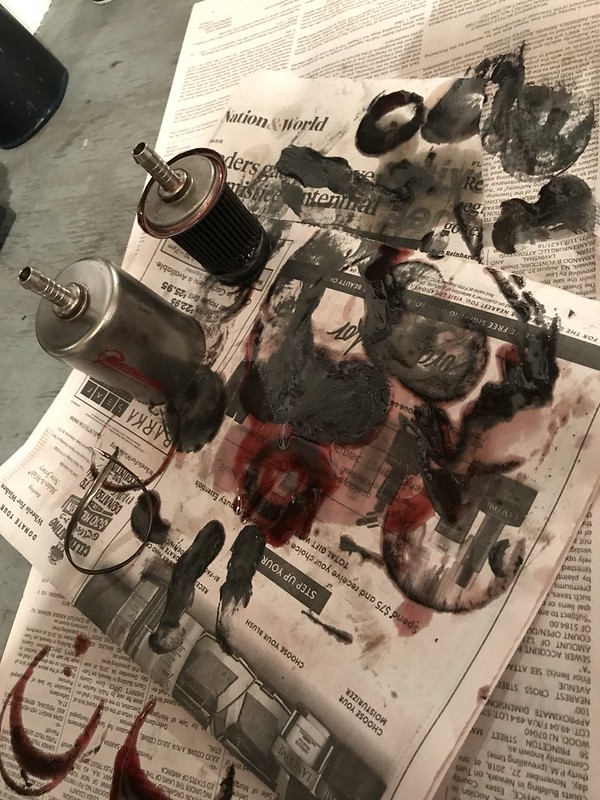
i guess next I will start removing the alternator, PS pump, headers, wiring, and transmission related stuff.* I'll drain trans fluid and engine oil also.*
anyone have any thoughts or input so far?
__________________
1987 IROC-Z - modified

|

|

|
 01-05-2020, 07:35 PM
|
#104
|
Join Date: Jun 2005
Location: Morris County, NJ
Posts: 137
|
Leme know when engine cmn out. If im off ill comeby and help
|

|

|
 01-06-2020, 07:39 AM
|
#105
|
Join Date: Nov 2007
Location: Jackson, NJ
Posts: 1,725
|
Just FYI, It is a real PITA to remove trans and engine because you need to clear the radiator support. I'd suggest unbolting the trans and taking them out separately.
__________________
1983 camaro- Scrap
1988 camaro- Also scrap
'05 Silverado- You guessed it, scrap
1988 TRX 250R- Ported w/ high compression on 110 octane- Out 60' your LT1
Jersey Shore Street Car Takeover (JSSCT) Founder
Quote:
Originally Posted by LS1ow

and once i get PHB, what do i ajust it too?
|
Quote:
Originally Posted by Jersey Mike

Seven.
|
|

|

|
 01-06-2020, 12:26 PM
|
#106
|
|
Mongo the Meet Coordinator
Join Date: May 2008
Posts: 16,900
|
If 4th gens are like 3rd gens, I would say just pull car off of engine/K member and trans/cross member. Very simple to do. Roll the assembly out, then yank motor off K if you need to toss it back under the car to remain a roller.
__________________
Quote:
Originally Posted by KirkEvil

repo bigals turd gen and part it out to a loving home
|
|

|

|
 01-06-2020, 08:37 PM
|
#107
|
|
10 Second Club / Meet Coordinator
Join Date: Dec 2004
Location: Roxbury, NJ
Posts: 2,118
|
thanks fellas.
yea, I have seen a bunch of guys on thirdgen.org take the engine/trans/cradle out from the bottom. It might be the way I do things in the future, but I wanted to try it the traditional way this time, which is my first time for an engine pull on a 3rd gen. I have fought with coil springs before, and it was a toss-up between the out the top method and fighting the bellhousing bolts VS. fighting the coil springs back into place if I took the whole front cradle out.
even though I have a 3 ton hoist, and took out the radiator etc, I listened to some wise advice from people here and TGO and decided to take the engine out and trans out seperately.. this time.
So, I removed the transmission today in a few short hours. driveshaft iout, trans lines are also out, converter, and the DynoDons y-pipe are also removed also. since it is my first engine pull on this type of vehicle, its probably much safer and less risky to simply just pull the engine out on it own.. right out of the top.
I plan to do this Saturday, unless the rain seems to be a problem. Joey D said he might come help, as well as a few neighbors. I am hoping it is pretty simple and things go well.


__________________
1987 IROC-Z - modified

|

|

|
 01-07-2020, 07:28 AM
|
#108
|
Join Date: Nov 2007
Location: Jackson, NJ
Posts: 1,725
|
IIRC make sure the distributor comes off before you yank the motor. I didn't and it made life more difficult than it needed to be.
__________________
1983 camaro- Scrap
1988 camaro- Also scrap
'05 Silverado- You guessed it, scrap
1988 TRX 250R- Ported w/ high compression on 110 octane- Out 60' your LT1
Jersey Shore Street Car Takeover (JSSCT) Founder
Quote:
Originally Posted by LS1ow

and once i get PHB, what do i ajust it too?
|
Quote:
Originally Posted by Jersey Mike

Seven.
|
|

|

|
 01-07-2020, 10:02 AM
|
#109
|
|
10 Second Club / Meet Coordinator
Join Date: Dec 2004
Location: Roxbury, NJ
Posts: 2,118
|
Cool, I had read that on TGO as well.
Full distributor removed right, not just the cap ?
__________________
1987 IROC-Z - modified

|

|

|
 01-07-2020, 02:47 PM
|
#110
|
Join Date: Nov 2007
Location: Jackson, NJ
Posts: 1,725
|
Yup, full thing. It gets really cuz of the wipers
__________________
1983 camaro- Scrap
1988 camaro- Also scrap
'05 Silverado- You guessed it, scrap
1988 TRX 250R- Ported w/ high compression on 110 octane- Out 60' your LT1
Jersey Shore Street Car Takeover (JSSCT) Founder
Quote:
Originally Posted by LS1ow

and once i get PHB, what do i ajust it too?
|
Quote:
Originally Posted by Jersey Mike

Seven.
|
|

|

|
 01-11-2020, 05:35 PM
|
#111
|
|
10 Second Club / Meet Coordinator
Join Date: Dec 2004
Location: Roxbury, NJ
Posts: 2,118
|
Engine is out!
prior to hooking up the engine I removed: distributor, alternator, evap canister, wiper motor, vac lines, fuel lines, power steering lines, the complete wiring harness, transmission, tv cable, throttle cable, headers, y-pipe, spark plugs, fans, radiator, trans cooler, etc. all that was left was the 2 thru-bolts in the engine mounts.
Joey D and one of my neighbors came by today and we setup the hoist and load leveler and pulled out the engine pretty quickly and effortlessly. I was going to do a video, but decided just to do a few photos instead.
So I guess next will be to remove the steering box and ship that out for a full rebuild. start figuring out the sheetmetal work... basically I want to fill in some of the unused holes and smooth them over before painting in there. I also want to make a few sheetmetal panels to mount the underhood wiring components (distribution block, charging post, relays, circuit breaker, etc) onto. I also plan to redo the brake lines, and completely eliminate the combination valve/proportioning valve all together. I want to get some NiCop lines and flare them neatly and not run them right next to the exhaust header like factory ones were.
For me and my skill level, the hardest part of this whole project is going to be the wiring and connections. I can do the basic wiring stuff, but nothing super advanced. PolarBear offered to help me out and possibly even build a new harness. My old harness has so much stuff on it, and I would love to only keep what I need for components like the body connections, alternator, wipers, fans, O2 sensor, coolant temp sensor/senders, etc. This will be a challenge for me, so i might have a LOT of questions for the board as time goes on.

question about this... this distributor and cap are 10 months old. why is one of the plug terminals a very different color? its from jegs. the whole unit.


__________________
1987 IROC-Z - modified

|

|

|
 01-12-2020, 07:56 AM
|
#112
|
|
Meet Coordinator
Join Date: Jan 2008
Location: brick/pt. pleasant beach
Posts: 19,341
|
Looks good. The wiring is easy, plenty of knowledge on this board to guide you with that. I'd send that pic to jegs and see if they'll replace it. Almost seems like that one post is a different quality metal and oxidized or something like that.
|

|

|
 01-16-2020, 12:18 AM
|
#113
|
|
10 Second Club / Meet Coordinator
Join Date: Dec 2004
Location: Roxbury, NJ
Posts: 2,118
|
yea, when I get some time, I'll call or email Jegs about it. looks like its a different metal on that one distributor cap's post. very interesting, but odd.
project update:
after pulling the engine out on Saturday, I removed the rest of the "stuff" in the engine bay. brake booster, brake master cylinder, line lock, old combination valve, brake lines, fuel lines, steering shaft, steering box, msd box, aluminum firewall plate, engine mounts, etc.
I shipped the oem steering box out to www.powersteering.com and they will do a full rebuild/refresh on it. since its the original one with 175,000 miles on it, and I plan to keep this car for a long time, as well as wanting to do more autcross, it felt like a smart decision. One of the fittings was frozen in the box, so in removing the fitting (of the return line) it broke.... I will need a new "return" hose aka "fluid cooler" line, so I'll have to find somewhere that sells those. any suggestions? Is the $13 one from autozone and advanced auto parts pretty much good enough?


I got the motor mounts out, and took them apart. the rubber was deformed, but not destroyed. I ordered some Polyurethane ones from Prothane. they should be here friday. I'll paint the metal clamshell and install the poly inserts, but have heard its quite a challenge to get the new mount's bolted into place...

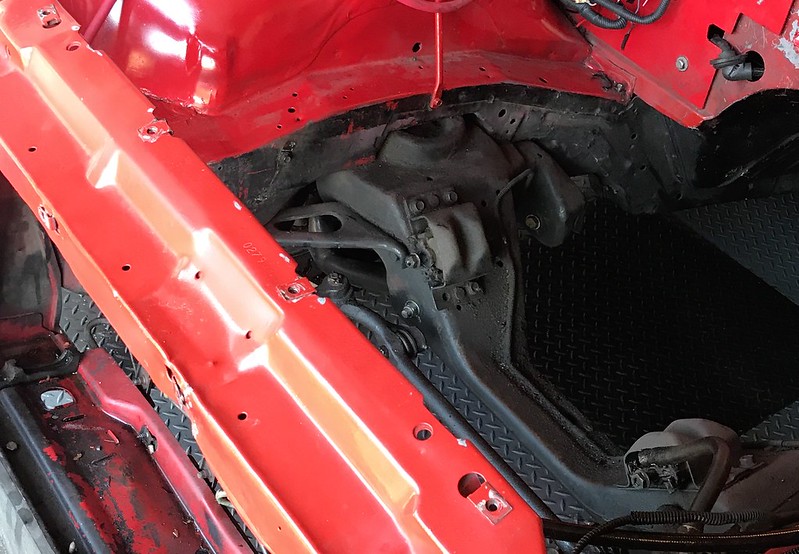
I de-greased the K member and lower body/suspension parts. Did a bunch of cleanup work and stripping with the wire wheel as well. I then got out the welder and spent a good amount of time filling in probably upwards of 30 holes in various parts of the engine bay sheetmetal that I don't plan on ever needing. They were mostly from the factory and were used to mount many components that I have removed from the car permanently. I then did a single coat of body filler, and starting tomorrow I will be sanding that down and doing another layer. then primer
I also had a large 3" wide U-bolt/clamp that I used to make a "tow hook" for possible future use. If this car ever needs to be brought around on a trailer or towed, I wanted a central hook/reciever that I could strap tow hooks to. I welded a piece of steel angle iron to the tapered section of the K member to make a larger flat bottom to the Kmember. then I welded the U bolt to it horizontally. I wish I had an ARC welder with me, but I did the best I could with my Mig welder. I did as many passes as it took, and the welds got sloppy after a while, but hopefully it is structurally solid. Bonus: it also gives me a larger flat spot for me to put a floor jack. I always hated putting the floor jack on the K member because of the small flat area right next to the angled/tapered front section. The new to hook is horizontal so it only added about 1/2 in reduced ground clearance...however my S&W torque arm crossmember, exhaust, and air dam plastic are much lower than this new tow hook is, so it will not be the lowest object under the car.


Next I have to work on cutting some panels out of 1/8" think aluminum to clean up the firewall, battery tray, evap charcoal canister tray, and some other open areas. I plan to sheet metal screw OR rivet these in place, and then they will get painted red like the rest of the underhood sheetmetal.
I also gotta take some time out to work on the brake system and figure out what fittings/adapters I will need. I will be buying a 25' roll of 3/16" Nickel-Copper line and making my own lines for a clean and orderly appearance.

Below are some photos of where I filled holes on the framerails, firewall, upper radiator support, and strut towers. Welded the holes shut and ground them smooth.



__________________
1987 IROC-Z - modified

Last edited by IROCZman15; 01-16-2020 at 12:25 AM.
|

|

|
 01-20-2020, 07:33 PM
|
#114
|
|
10 Second Club / Meet Coordinator
Join Date: Dec 2004
Location: Roxbury, NJ
Posts: 2,118
|
several sessions of body filler, sanding, smoothing, and finally, the holes I wanted to fill are now hidden. I then got some 1/8" aluminum sheet-metal for $30 at a local sheetmetal place in Dover. Made up some paper templates for the firewall, battery tray, evap canister tray, and some of the areas on the inner fenders that were left open from the factory and seem unsightly to me. the one on the passenger side with the horizontal hole cut in it if for the three 1-gauge wires to come through (power, power, and ground). the plate where the battery used to be will be where my power distribution block will be, a jump post, and a 150 amp circuit breaker. so far, nothing will be on the drivers side plate. maybe in the future I could mount a small fuel cell for a nitrous system's independent fuel pump.


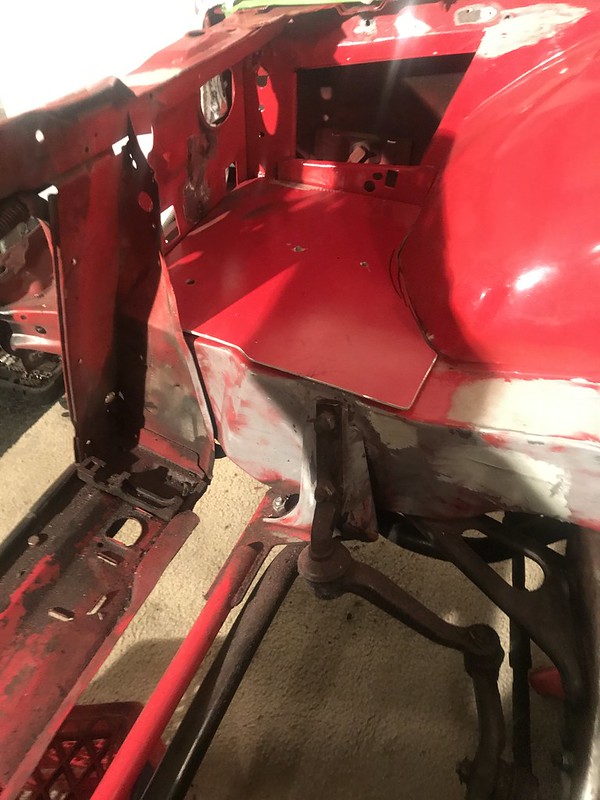

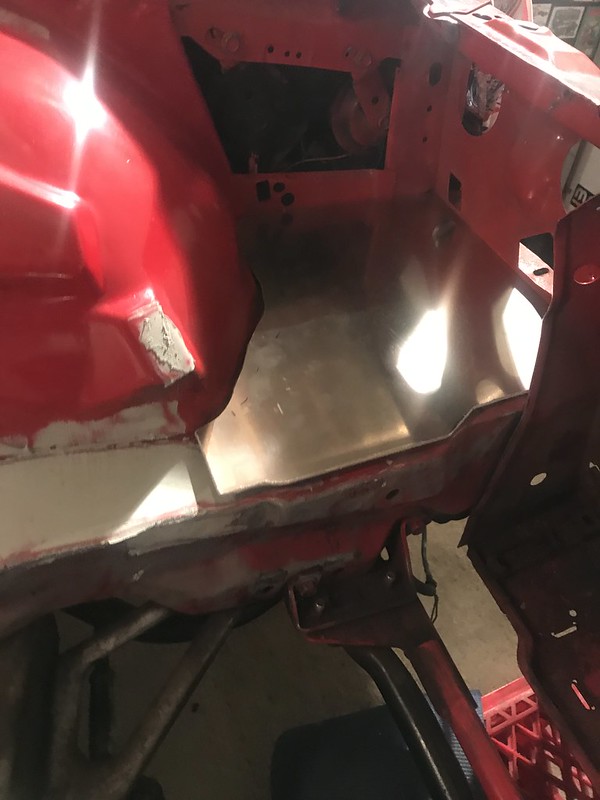


I acid etched the primer and seam sealed the aluminum panels in place. I don't mind the sheetmetal screws, since I am not going for any Riddler awards with this car, and also because I can't weld aluminum. I know some people will not like the screw heads, but thats the only way i could think to do it, knowing rivets weren't really a feasible option. its still just a street car built in a my small garage.


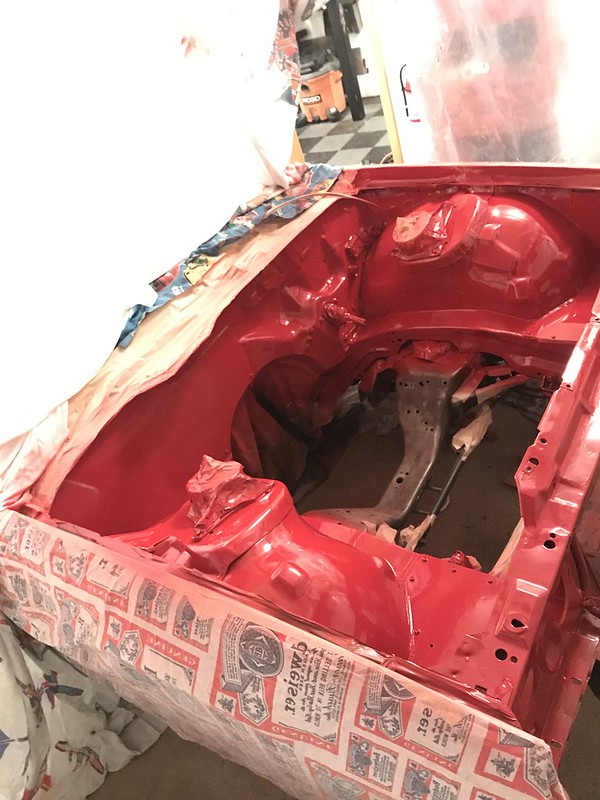
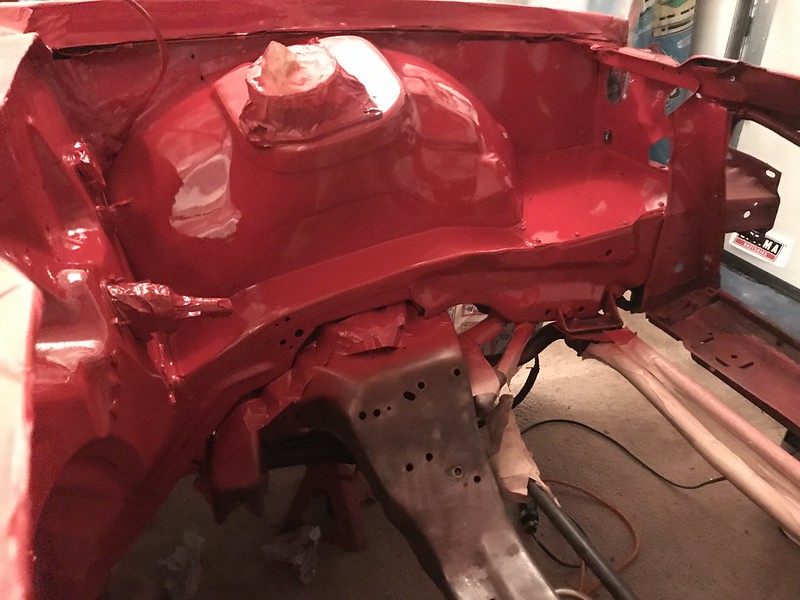
Sanded the every surface underhood with 220 sandpaper. wiped everything with prep-solution and tack-cloths. I sprayed 3 coats of primer. was nice to see everything in "one color" for a change.
I toyed with the idea of removing the UMI strut tower mounts and painting under them. For the first time in years, I am super incredibly happy with the alignment I currently have on the car; since I have redone the alignment in the spring of the past 4 years. I am getting tired of bringing it somewhere only to have the shop be leery of setting the specs to my request, and STILL have yet to find a shop that helped me set it exactly how I wanted it to be. Therefore I decided to leave the strut tower mounts exactly where they are and keep my alignment. The new engine and battery relocation will change my corner weights, but i won't know how that will effect the car until it is all set and done. If the alignment is way wacky then. I'll get it corrected.. and figure out a way to touch up the paint under the strut mounts if they are to shift significantly in any direction.


Today, my dad came over and we painted. Dupont (Nason)brand Flame Red, which is the exact same color as the exterior of the car. prior to this year, my engine bay paint was simply rattle can paint that I would spray every few years. no more of that! He used to paint custom vans, choppers, and cars back in the 70's and 80's, and was locally famous for his air-brush murals. (see this link for his old artwork https://www.freewebs.com/iroczman15/...oldartwork.htm ). he sprayed the first coat of paint to show me how it was done, and then I sprayed the remaining 3 coats. 4 in total.



Polyurethane motor mounts from Prothane arrived.
I will install them in a day or two, after I paint the K-member, steering linkages, and radiator opening with POR15 black, by hand. does the orientation of the mount look correct to you guys? I referred back to my photos to figure out the position of the metal tabs in the insert, but if something is wrong, please let me know asap


next is the POR15 black chassis paint, and then I wills tart working on the brake line system and positions.
__________________
1987 IROC-Z - modified

Last edited by IROCZman15; 01-20-2020 at 10:24 PM.
|

|

|
 01-20-2020, 08:26 PM
|
#115
|
Join Date: Jun 2005
Location: Morris County, NJ
Posts: 137
|
If only everyone who works on their cars was as detail oriented and meticulous as you the car world would be a better place. Nice work.
|

|

|
 01-22-2020, 10:55 PM
|
#116
|
|
10 Second Club / Meet Coordinator
Join Date: Dec 2004
Location: Roxbury, NJ
Posts: 2,118
|
thanks Joe
I got the K-member and some other chassis/suspension components cleaned up and then coated with black POR-15 turned out nice.
Also mocked-up and bent all new NiCopp brake lines too. I will finish those and post photos tomorrow once everything has been adjusted and the system is tested. will need to bench bleed the master and also bleed the systemwhile checking for leaks.
-was considering going to a DOT5.1 fluid (not DOT 5), but I am unsure. I wont be doing any road course racing this year, possibly just autoX, drag racing, and street duty. thoughts on brake fluids?
also, I am beginning my research for an aluminum radiator. direct fit if possible. it wont be blocked by any A/C condenser, so it will get a straight blast of moving air from the camaro's open grill. I plan to use the two factory puller fans, which will be controlled by the Holley Sniper. thoughts and opinions on radiators. Trying to stay around the $400 range.. not the $900 range of the high end radiator companies. 2 or 3 core, but as Direct fit as possible. full aluminum with automatic transmission cooler fluid ports too.
I was also thinking about the evans waterless coolant since everything in the cooling system will be new and I won't need to cleanse the system out of old coolant. Does evans coolant allow me to NOT need a coolant overflow tank then? I read that somewhere... and that could save me some money if I didnt need an overflow/reserve tank?
__________________
1987 IROC-Z - modified

Last edited by IROCZman15; 01-22-2020 at 11:06 PM.
|

|

|
 01-25-2020, 12:15 AM
|
#117
|
|
10 Second Club / Meet Coordinator
Join Date: Dec 2004
Location: Roxbury, NJ
Posts: 2,118
|
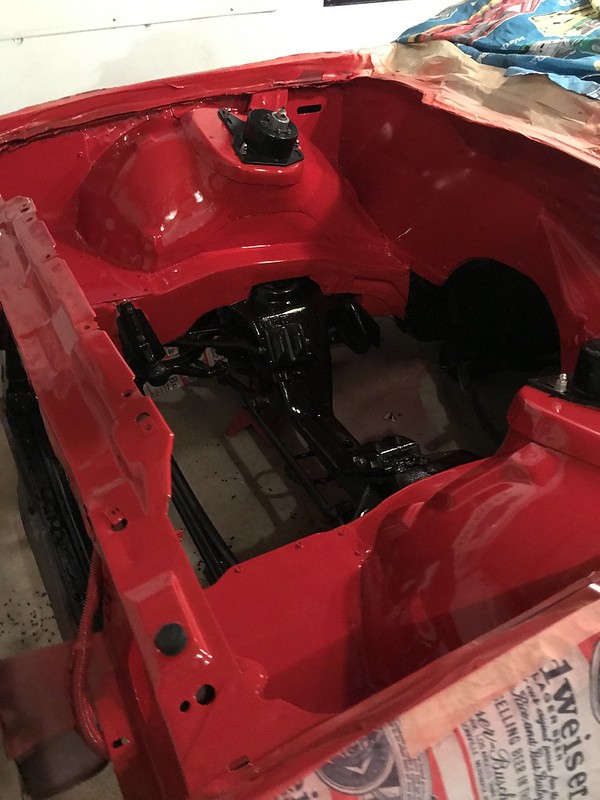
So I got the K-member, tow hook, steering components, radiator housing, and wonderbar painted black with some POR-15.
I also painted the brake booster gloss black, as well as the UMI strut mounts, just to freshen things up.
I also installed the Prothane Polyurethane motor mounts.. and I think they are facing the right way up too!


I bought a 25' roll of Nickel Copper NiCopp 3/16" brake tubing as well as a variety of fittings and bent up my own brake lines.* I wanted something much cleaner and more simple than stock. I eliminated the stock style combination valve/proportioning valve, because I already have an in-line Wilwood valve mounted under the car that I can adjust with the knob adjuster.* I think the brake like project came out nice and it is simple, clean, and now the brake lines don't pass* millimeters away from any of the hot exhaust headers or rotating steering shaft.* I bench bled the master cylinder, and then my wife helped me bleed the whole brake system while checking for leaks.* *all went well
here is the old brake line mess:

and the new setup:


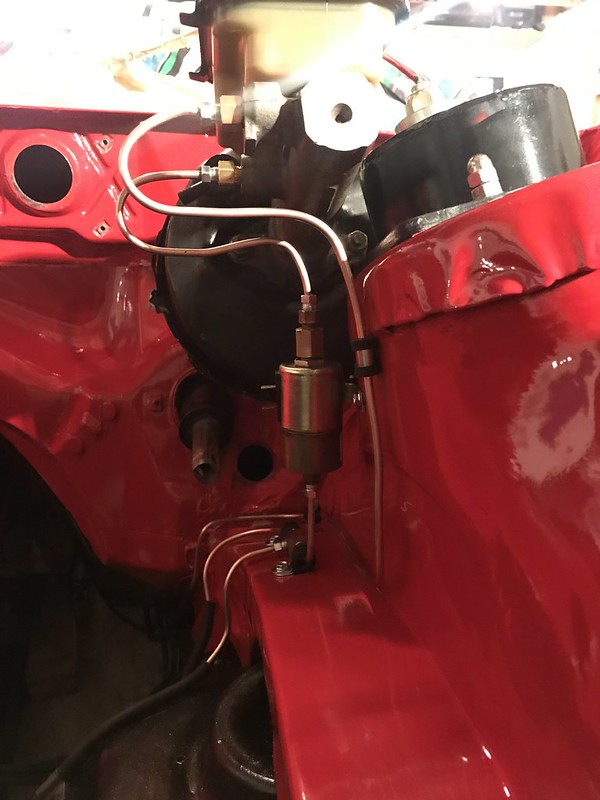
I started to install the under-hood electrical components (Positive power jump-post, 150 amp circuit breaker, and power distribution block.. but thats about as far as I can go for now.. until the engine arrives in a* few weeks, and then I can figure out what wire lengths I need for the array of electrical components.


So, in the meantime....
I'm struggling to figure out the best choices for my cooling system overhaul. I made a thread about it here..
* ** https://www.thirdgen.org/forums/cool...tor-water.html
ANY advice is super appreciated!!!
FYI I am not a mechanic; this is simply a hobby for me.. and I* know I got involved in a big project here. So far it is going very well. Lots of research here on njfboa, but mostly on TGO and elsewhere has helped.. but I am definitely hoping for some more feedback from the group here!* * basically,* if I am making any bad (or good) choices regarding parts, mechanics, etc, PLEASE let me know. I would rather know about it now and fix whatever I can, instead of troubleshoot a bigger problem later.* I know I am going to have some difficulty with the wiring (and eliminating the factory harness/electronics) so I am certainly going to need some help with that.
thanks guys
__________________
1987 IROC-Z - modified

Last edited by IROCZman15; 01-25-2020 at 12:19 AM.
|

|

|
 01-25-2020, 08:26 AM
|
#118
|
|
Admin.
Join Date: Aug 2005
Location: Hamilton, NJ
Posts: 20,153
|
I am very happy with the 3 core Mishimoto radiator I bought. Got it from Josh.
__________________
Vent Windows Forever!
The looser the waistband, the deeper the quicksand. Or so I have read.
Feather-light suspension, Konis just couldn't hold. I'm so glad I took a look inside your showroom doors.
Hey everybody, it's good to have you on the Baba-too-da-ba-too-ba-ba-buh-doo-ga-ga-bop-a-dop
|

|

|
 01-26-2020, 07:47 AM
|
#119
|
|
Meet Coordinator
Join Date: Jan 2008
Location: brick/pt. pleasant beach
Posts: 19,341
|
Ceramic coat all that beautiful paintwork now! Since you drive the **** outta your car 
|

|

|
 01-28-2020, 10:25 PM
|
#120
|
|
10 Second Club / Meet Coordinator
Join Date: Dec 2004
Location: Roxbury, NJ
Posts: 2,118
|
thanks Scott and Adam. Man, I wish I had the $ to ceramic coat the paint job. that would be helpful. sadly, I have no way to get the car to a place, and my budget for this build has gotten much much tighter since Early December (I had to abort the roll--bar part of the build). I'll do my best to keep the paint clean and pretty underhood
I did see that Mishimoto rad for sale and I remember you discussing it with me at the UMI event. it is one of my top contenders
I hope to place the order for the cooling system parts at the end of this current week.
- Fans: using stock ones with self-built relays and wiring (have had much advice from Polar Bear with the wiring, he is a huge help) I will use TWO 40 amp relays ..one per fan. fans will be controlled for on/off temps by the holley sniper unit, which is a negative ground trigger ? i think? and then from the +power bus-bar I will use a 6" fusible link wire (14 gauge) connected to a 10 gauge power wire.
- Thermostat and housing - still To be determined...
- Evans waterless coolant: 4 gallons
- Hoses - basic rubber ones from local auto parts store
- coolant expansion tank: an inexpensive fabricated/polished aluminum one, preferably with a single fluid port which is located on the bottom. $20-50 range for this piece, maybe this champion one: https://www.championradiators.com/3x9_overflow_tank yet, I have to keep looking around though
- water pump: SBC oem style mechanical LONG water pump. in the $100 range for a polished or chrome one that has increased flow and clockwise rotation, Tuff-Stuff makes a bunch (which confuses me), milodon, ac delco also, etc. thoughts? I will be painting and REusing the belts/pulleys/etc from my OEM style 87 accessory drive setup. photos are above when I pulled the motor out a few weeks ago.
Choices:
1. ProForm $120
https://www.summitracing.com/parts/p...t/model/camaro
2. TuffStuff (one of them) $143
https://www.summitracing.com/parts/t...t/model/camaro
...note.. I don't know why so many TuffStuff pumps would work and I don't see their differences ?
3. Other? suggestions??
and lastly, radiator: I am pretty set on a 2 row "direct fit" style. I do like the polished and fabricated aluminum style over the oem "stamped" style. I know I will need to trim the rubber mounts a bit; not worried about that. Since I do NOT have $800 for a Dewitts, Griffin, or BeCool......I am very tempted by the 2 row "Chinese ones"
heres my choices:
1. Champion 2 core 3/4" rows $180
https://www.jegs.com/i/Champion-Cool...791+4294829509
2. Cold Case 2 row 1" rows $360
https://www.summitracing.com/parts/r...t/model/camaro
3. Mishimoto 2 row unknown row width? $3.10
https://www.summitracing.com/parts/m...t/model/camaro
4. TPIS 2 core 1" rows $345
https://www.tpis.com/parts/view/262
I spoke to Nyes racing engines yesterday, and they are hopeful to have the engine complete or almost complete this week. If so, that would be great. I have almost run out of things to work on under the hood until I have the engine mounted and then comes the wiring process of everything and reassembly of the car.
__________________
1987 IROC-Z - modified

Last edited by IROCZman15; 01-28-2020 at 10:45 PM.
|

|

|
 01-29-2020, 07:08 AM
|
#121
|
|
The Mayor / 2009 Member of the Year / Moderator
Join Date: Jan 2005
Location: Northwest
Posts: 8,867
|
While it's all apart and before the engine mount kit comes in, why not do the ceramic at least underhood yourself? It isn't rocket science, and with your attention to detail and patience should be fine and a lot cheaper. You may want to PM Kat on here, I know he's done a bunch.
__________________
1995 Z28 Convertible A4 13.78 @ 100 (CAI, high flow cat, catback, 160 thermo, hypertech, Strano springs, Koni yellows, sway bars, 3 pt. UMI SFC)
2018 Sea Doo GTX - 3 cylinders and das boooooost
Quote:
Originally Posted by BonzoHansen

Is English your 2nd language? Did you graduate high school? Your posts make my head hurt.
|
 Team FARM Team FARM 
|

|

|
 01-29-2020, 08:08 AM
|
#122
|
|
Mongo the Meet Coordinator
Join Date: May 2008
Posts: 16,900
|
If the sniper is like the terminator stuff, you can make your I/O +,-, or -pwm
I would bump the fusible link size up, not sure what the factory fans draw but keeping it all #10 is probably a safe bet.
__________________
Quote:
Originally Posted by KirkEvil

repo bigals turd gen and part it out to a loving home
|
|

|

|
 01-29-2020, 08:40 AM
|
#123
|
|
10 Second Club / Meet Coordinator
Join Date: Dec 2004
Location: Roxbury, NJ
Posts: 2,118
|
Ok. Cool. Good to know about the sniper
I thought for fusible links you had to build them 4 wire gauge sizes smaller than the wire they are protecting? Basically If I have have 10 gauge power feed wire to the fan motors, to protect it I would have it connected to a 6” length of 14 gauge fusible link wire coming directly off the bus bar/power distribution block. I thought I read that’s how to do it ? I certainly could be wrong about this though
__________________
1987 IROC-Z - modified

Last edited by IROCZman15; 01-29-2020 at 08:47 AM.
|

|

|
 01-29-2020, 09:06 AM
|
#124
|
|
Admin.
Join Date: Aug 2005
Location: Hamilton, NJ
Posts: 20,153
|
I don't get the love for evans, but have at it i guess. If you ever race somewhere that requires water you are SOL. I just run 50/50 with a bottle of purple ice.
I'm using a Stewart stage 2 water pump. 180* stat. I just use a basic high flow Robert Shaw style stat. I tried the Stewart one with bleed holes and my car would not heat up so i put a regular one in. Not sure if i got a bad one though.
Why not the 3 row Mishimoto? https://www.summitracing.com/parts/m...m82x/overview/
My car never gets hot.
I'd give each relay its own link so if one fails the other fan still runs.
Are there covers for all those exposed hot terminals?
__________________
Vent Windows Forever!
The looser the waistband, the deeper the quicksand. Or so I have read.
Feather-light suspension, Konis just couldn't hold. I'm so glad I took a look inside your showroom doors.
Hey everybody, it's good to have you on the Baba-too-da-ba-too-ba-ba-buh-doo-ga-ga-bop-a-dop
|

|

|
 01-29-2020, 09:21 AM
|
#125
|
|
Meet Coordinator
Join Date: Jan 2008
Location: brick/pt. pleasant beach
Posts: 19,341
|
I’d go with fuses over the links. If they go, it’s a pain in the ass replacing.
|

|

|
 Posting Rules
|
You may not post new threads
You may not post replies
You may not post attachments
You may not edit your posts
HTML code is Off
|
|
|
|
|
|

