 |
|
 04-03-2015, 05:39 PM
|
#1
|
|
Resident Camera Guy

Join Date: Aug 2004
Location: North Jersey
Posts: 10,971
|
Tastefull Interior Modifications
Since this Spring weather refuses to co-operate and my car is stored outside, I have a number of on going projects that I'm working on from the comforts of my own home. I figured I could keep you guys posted on some of my mini projects.
I recently scored a good ebony leather interior out of a 2002 Formula (Huge thanks to V!) and the end game is to remove that fantastic 90's Light Grey trim that currently resides in the car. I was originally inspired for this interior build when I first saw the Mercedes-Benz C63 AMG interior a few years ago, I thought it was the perfect balance of black, cloth, leather, silver trim and carbon fiber. Unfortunately I'm not filthy stinking rich and can't really afford real carbon fiber and had been hearing great things about 3M's Di-Noc Carbon Fiber vinyl wrap, so I picked up a few rolls to practice. I know its not for everyone, but I'm a fan and I think it can be implemented properly in our cars to add a little bit of a high end look!
C63 AMG Interior:

I started by cleaning and preparing all the interior surfaces with a quick wipe down using Isopropyl Rubbing Alcohol, using cotton balls and swabs to get the little nooks and crannies, and followed it by using a lint free rag to ensure the surface was clear of any grease & grime

Since the dash is already apart, I began by purchasing a set of Macewen silver over-lays for the Guages & HVAC controls, as well as a 6LE Guage Trim:


(Later on I'll separate the needles to wetland clear, and install blue LED's)
I started by removing the HVAC knobs:
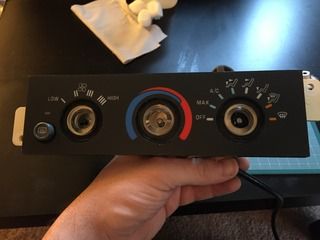
The Headlight dimmer was stubborn, so I ended up disassembling the switches and cleaning the contacts:


Applying the decals was pretty straight forward:

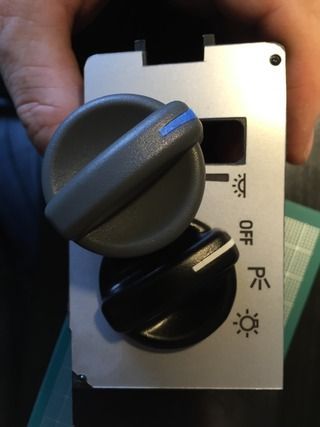
I wasn't satisfied with the way the light grey knobs sat against the silver over-lay, so I purchased a can of Duplicator interior & vinyl spray, masked off the white indicator strip:
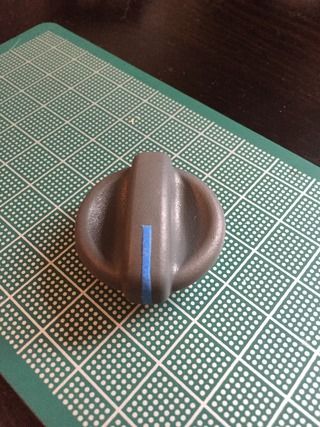
Finished product:


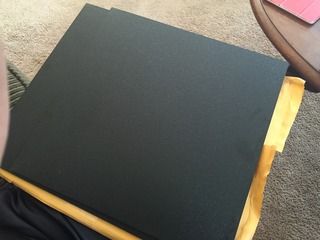
Now that the easy part of applying decals was over, it was onto tackling the 3M Carbon Fiber Vinyl, I purchased a good heat gun from Harbor Freight, and started applying the decal, but I wasn't happy with my first attempt, it bunched up at the edges of the radio bezel, so I'm going to retry when I'm fresh. I have a sheet of ABS plastic in the mail, as I am completely removing the stereo system from the car.

I'll keep updating the thread as I move along. Hope you've enjoyed so far!
__________________

Last edited by ar0ck; 04-03-2015 at 06:05 PM.
|

|

|
 04-03-2015, 06:08 PM
|
#2
|
|
Power Member/NJFBOA Bookie/Moderator
Join Date: Jun 2009
Location: North Jersey = Best Jersey.
Posts: 4,435
|
Neat stuff! Being that I have spares, my intent is to wrap the door sills and the sail panel triangle in some psuedo carbon fiber vinyl. I'll be monitoring your progress for sure!
__________________
 1995 Firebird... Stock-ish.
Quote:
Originally Posted by LS1ow

Good. He microwaved my phone 6 years ago, i hope his intake erupts.
|
|

|

|
 04-03-2015, 06:28 PM
|
#3
|
|
Meet Coordinator
Join Date: Jan 2008
Location: brick/pt. pleasant beach
Posts: 19,342
|
Nice man. There is a thread in ls1tech's appearance & detailing section where some russian guy is wrapping real carbon fiber over the plastic parts. Its coming out extremely well! There's also a guy that added an OLED screen to the gauge cluster in lieu of the digital odometer. Looks pretty cool.
|

|

|
 04-03-2015, 10:01 PM
|
#4
|
Join Date: Aug 2004
Location: North Jersey
Posts: 3,047
|
Looks awesome so far!
__________________
Seeya,
Steve R. in North Jersey
'16 Go-Mango Dodge Charger R/T. It's so good to be back in a V8-powered, RWD car!
Former Toy - '88 Monte SS - had lots of mods...
|

|

|
 04-04-2015, 12:06 PM
|
#5
|
|
10 Second Club
Join Date: Feb 2008
Location: Eatontown
Posts: 1,647
|
dont be afraid to really stretch the vinyl wrap when its hot to get over the curves and edges, that will prevent material from bunching up at corners. Looks good!
__________________
1999 C5 FRC: 12.7@114
2008 TBSS: 12.48@108
2017 Silverado 2500 do you even lift breh?
|

|

|
 04-04-2015, 01:47 PM
|
#6
|
Join Date: Sep 2008
Location: Hackettstown, NJ
Posts: 1,650
|
I've actually had some luck at using RIT dye to dye plastic in the past.
__________________
1998 Z-28 - SLP lid - Ported TB - LS6 Intake - Dynatech SS headers/Catted Y - Magnaflow Exh - 3.42 - Yank SS3600 - UMI weld-in subframe connectors, Adj LCA, Adj PHB, Q1A TA - Bolt-in Relocation Brackets - Strano springs - Koni shocks - 17" C6Z06 wheels - 326HP/335ft-lbs - 12.35 @ 110.41
Quote:
Originally Posted by Blackbirdws6

I can appreciate a dream but this person needed some real friends.
|
|

|

|
 04-04-2015, 03:29 PM
|
#7
|
Join Date: May 2009
Location: Highland Mills, NY
Posts: 1,915
|
Looks great
__________________
2000 Camaro SS 610rwhp/570rwtq LS2 440, 12 bolt 3.73, tranzilla t56
|

|

|
 04-06-2015, 12:07 AM
|
#8
|
|
^^^Lover of bad cars^^^ Meet Coordinator
Join Date: Aug 2007
Location: Whitehouse Station
Posts: 2,262
|
Why not just wrap your current interior and sell me the ebony????  lmao. I always wanted to customize my interior but I suck at arts and crafts
__________________
1986 Honda VFR750 - 89.3HP to the wheel
2000 Trans Am M6 - Mods: Yes.
2018 Durango R/T - AFE Intake, JLT Catch Can, Stainless Works Catback, Vinyl Dodge Racing Stripes
2003 Toyota Matrix XRS M6 - Lol

|

|

|
 04-06-2015, 11:49 AM
|
#9
|
|
Meet Coordinator
Join Date: Jan 2008
Location: brick/pt. pleasant beach
Posts: 19,342
|
|

|

|
 04-06-2015, 12:35 PM
|
#10
|
|
Lord of the rings / 10 Second Club / Meet Coordinator
Join Date: Aug 2004
Location: Millstone Township, NJ
Posts: 6,361
|
Looking good so far.
Quote:
Originally Posted by sweetbmxrider

|
That's pretty cool. I saw the interior pieces but not the gauge cluster.
__________________
 97 T/A Ram Air Convt
Forever dyno queen / 777rwhp 662 rwtq @ 17lbs / 10.2 @ 140
'24 Corvette Z06
17 Sierra 2500HD Dmax
81 Turbo TA
|

|

|
 04-06-2015, 01:23 PM
|
#11
|
|
Resident Camera Guy

Join Date: Aug 2004
Location: North Jersey
Posts: 10,971
|
Quote:
Originally Posted by KirkEvil

dont be afraid to really stretch the vinyl wrap when its hot to get over the curves and edges, that will prevent material from bunching up at corners. Looks good!
|
Thanks for the tip, It definitely helped, I finished the radio bezel late last night and I'm pretty happy with the outcome. This 3M Material is very pliable when heated properly.
Quote:
Originally Posted by sweetbmxrider

|
I had seen the Moscow Firebird, I really liked what he did, but thats beyond my skill level. I'm still in basic arts & crafts 
That dash board swap though is amazing!
__________________

|

|

|
 04-06-2015, 01:55 PM
|
#12
|
|
^^^Lover of bad cars^^^ Meet Coordinator
Join Date: Aug 2007
Location: Whitehouse Station
Posts: 2,262
|
Yeah that dashboard is intense. brings our cars into the current technology world lol
__________________
1986 Honda VFR750 - 89.3HP to the wheel
2000 Trans Am M6 - Mods: Yes.
2018 Durango R/T - AFE Intake, JLT Catch Can, Stainless Works Catback, Vinyl Dodge Racing Stripes
2003 Toyota Matrix XRS M6 - Lol

|

|

|
 04-06-2015, 06:20 PM
|
#13
|
|
Resident Camera Guy

Join Date: Aug 2004
Location: North Jersey
Posts: 10,971
|
I'll snag a better picture later:
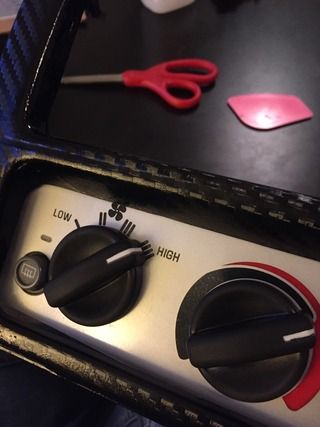
This also came to replace the radio:
__________________

|

|

|
 08-14-2015, 10:14 PM
|
#14
|
|
Resident Camera Guy

Join Date: Aug 2004
Location: North Jersey
Posts: 10,971
|
I managed to make a lot of progress this week, but theres a few parts still missing before I show off the finished center console.
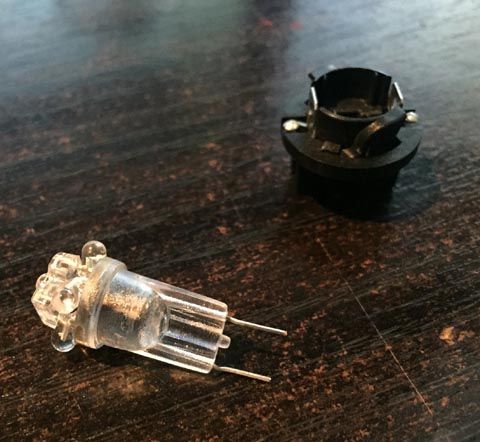
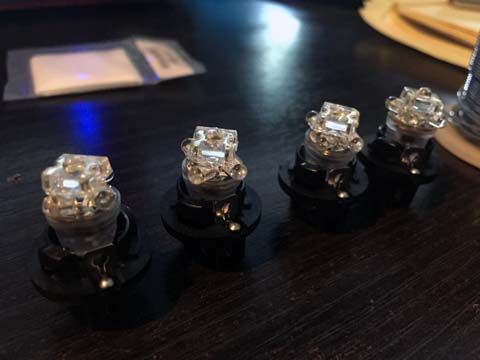
I started by replacing all the bulbs in the gauge cluster with Blue LED's from www.superbrightleds.com, I ran into some trouble that I was unaware of. I thought it was a simple plug and play procedure, but I ended up needing to take apart the bulb assembly, dropping in the LED's and re-sottering the new LED's into the base.
Factory bulb assembly:

Factory bulb vs. LED's:

Finished product:
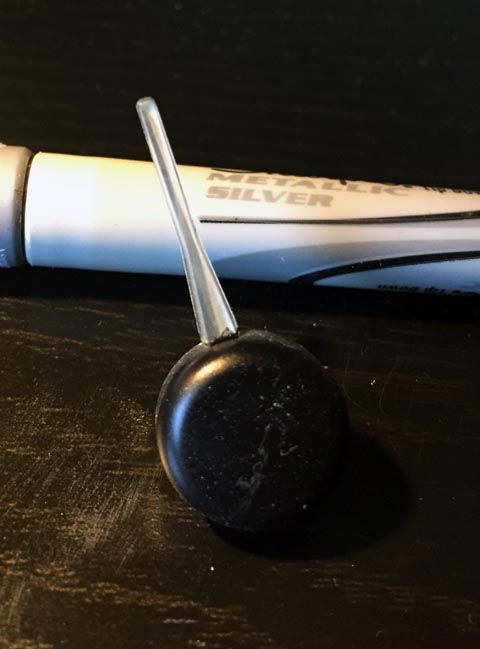
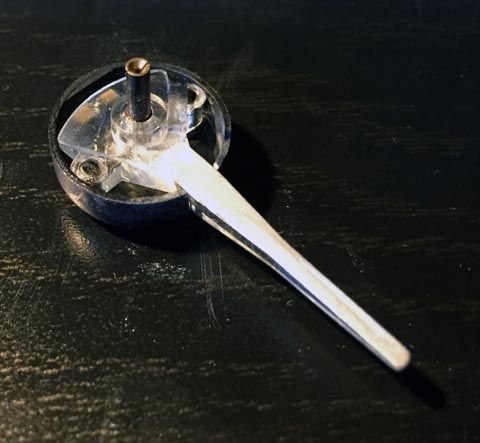
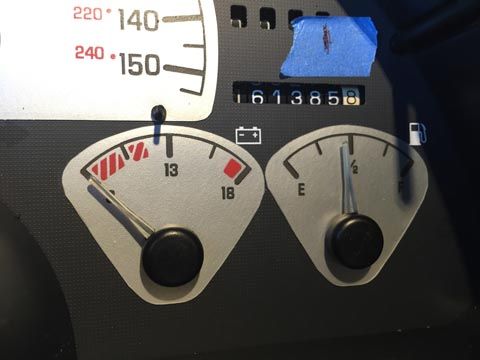
Next I popped off the needles and laid down a silver over-lay kit from Hawks. I took off the needles from the gauge assembly and used Dupli-Color interior paint and painted the caps semi-gloss black, then began sanding off the white/yellow base of the needles to produce a clear effect. In order for the Blue LED's to shine through the needle I painted the back with silver paint to give the needles a clear/silver appearance on the silver gauges.
I also decided to keep my bolt-in roll bar that was in rough shape and needed a new coat of paint so I went with a Rust-oleum "Soft Iron"
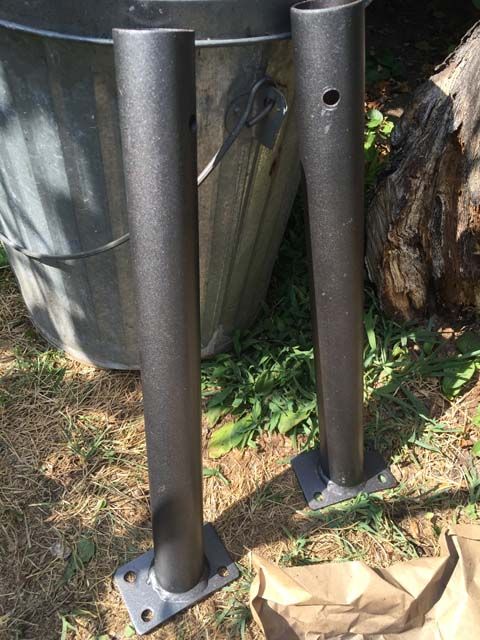 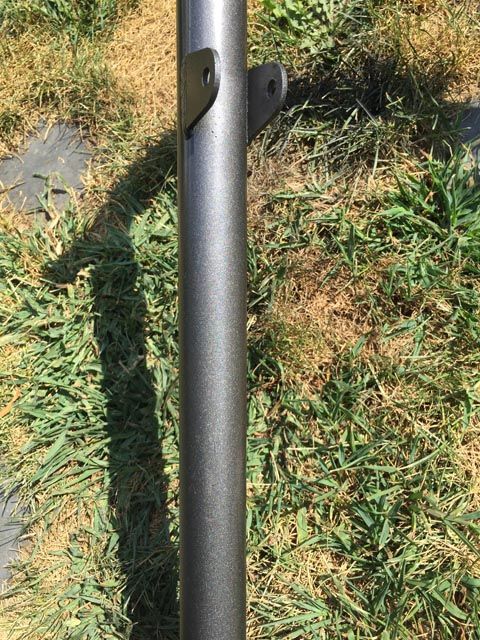
It is a self priming paint and I laid it down thick and it turned out really good!
Spray-can restoration at its best!
__________________

|

|

|
 08-14-2015, 10:41 PM
|
#15
|
|
Lord of the rings / 10 Second Club / Meet Coordinator
Join Date: Aug 2004
Location: Millstone Township, NJ
Posts: 6,361
|
Love all the little touches. Nice job.
__________________
 97 T/A Ram Air Convt
Forever dyno queen / 777rwhp 662 rwtq @ 17lbs / 10.2 @ 140
'24 Corvette Z06
17 Sierra 2500HD Dmax
81 Turbo TA
|

|

|
 08-15-2015, 08:14 AM
|
#16
|
|
Meet Coordinator
Join Date: Jan 2008
Location: brick/pt. pleasant beach
Posts: 19,342
|
Looking good man. How is the silver on silver? My only thought would be it might take more than a glance to see where the gauge is pointing. Excited to see the entire interior!
|

|

|
 08-15-2015, 12:22 PM
|
#17
|
Join Date: Dec 2008
Location: NNJ
Posts: 1,489
|
That looks great! I like the silver /silver gauges, will look sweet with the blue at night.
__________________
1997 Camaro Z28 - 355 LT1, T56, CC503, LTs, ORY, Bald Eagle-back exhaust, !emissions, Lingenfelter CAI, EWP, !CAGS, BMR LCAs, UMI PHB, Koni Str.t/Koni SA, C5 Z06 front / LS1 F-body rear brake swap, factory hurst with short stick  2014 2LT Cruze 2.0 Turbo Diesel
|

|

|
 08-15-2015, 01:31 PM
|
#18
|
|
BadMod
Join Date: Aug 2004
Location: hamilton, nj
Posts: 8,889
|
Quote:
Originally Posted by sweetbmxrider

Looking good man. How is the silver on silver? My only thought would be it might take more than a glance to see where the gauge is pointing. Excited to see the entire interior!
|
Yah maybe a pinprick of an offsetting color at the very tip if there is a issue
__________________
So much stupid, so little time.
Quote:
Originally Posted by 79CamaroDiva

It started before I drove your car. I just have to look at it the wrong way and your car poops parts.
|
Mercerville MotorSports, LLC
|

|

|
 05-16-2016, 10:41 PM
|
#19
|
|
Resident Camera Guy

Join Date: Aug 2004
Location: North Jersey
Posts: 10,971
|
Bringing an old thread back, but now that I have the car slowly coming back together, the LED's aren't coming on in the gauges. Is it possible that that when I re-sottered the LED's the original twist ins that they are polarized (an actual positive negative) and that if one is wrong, its causing the whole system to not power up? I had previously messed with my dimmer switch too so its also possible that it is also an issue.
Can I put a 9V Battery to the socket to get power to the LED just to test them individually?
__________________

|

|

|
 05-17-2016, 07:48 AM
|
#20
|
|
Meet Coordinator
Join Date: Jan 2008
Location: brick/pt. pleasant beach
Posts: 19,342
|
9 volt should work, yes. None work? Either you managed to put all of the leds in backwards or you goofed something else up  Check the gauges fuse. Does anything else light up? Door panels, radio, hvac controls etc?
|

|

|
 05-17-2016, 08:28 AM
|
#21
|
|
Lord of the rings / 10 Second Club / Meet Coordinator
Join Date: Aug 2004
Location: Millstone Township, NJ
Posts: 6,361
|
Agreed. It would be odd for you to put every single LED in backwards. If so, go play the lottery now.
__________________
 97 T/A Ram Air Convt
Forever dyno queen / 777rwhp 662 rwtq @ 17lbs / 10.2 @ 140
'24 Corvette Z06
17 Sierra 2500HD Dmax
81 Turbo TA
|

|

|
 05-17-2016, 08:42 AM
|
#22
|
|
Resident Camera Guy

Join Date: Aug 2004
Location: North Jersey
Posts: 10,971
|
Quote:
Originally Posted by sweetbmxrider

9 volt should work, yes. None work? Either you managed to put all of the leds in backwards or you goofed something else up  Check the gauges fuse. Does anything else light up? Door panels, radio, hvac controls etc? |
I'll definitely check the fuse (this post was late night musing), but if the fuse blew would that affect the needles? Because they work fine.
I didn't think about the door panel lights, as they are disconnected and I don't have a radio or HVAC anymore.
__________________

|

|

|
 05-17-2016, 10:05 AM
|
#23
|
|
Meet Coordinator
Join Date: Jan 2008
Location: brick/pt. pleasant beach
Posts: 19,342
|
It looks like it feeds the actual gauges, yes. Courtesy also feeds instrument cluster and there is a dimmer fuse as well. Also, the gauge lights are in parallel so one can be incorrect and the others would still work. Does the headlight switch light up or did you do an led there as well? It looks like the dimmer fuse feeds the lights, so I would start there. I believe it will be a gray wire coming from the fuse and going to the gauges. Check for power at the dimmer connector. If only one side has power with lights on, switch issue. No power, fuse/feed issue. Power to the cluster, cluster/ground issue. Let me know if you need further explanation or clean this gibberish up 
Figure this might be up your alley
http://ls1tech.com/forums/appearance...mats-ever.html
Who knows if they are legit or just **** though.
Last edited by sweetbmxrider; 05-17-2016 at 10:07 AM.
|

|

|
 05-17-2016, 10:28 AM
|
#24
|
Join Date: Aug 2007
Location: Piscataway, N.J.
Posts: 1,729
|
Really awesome detail work. Looks stock, but what I like is that if you know what your looking at, the right people will be amazed at the work put into it.
On a quick note, it you like the faux carbon fiber look, there are kits that use 3M backing for pre-cut stick ons.
__________________
1991 FORMULA 350-GONE BUT NOT FORGOTTEN
1 of 1,197 with L98 Option/13.79@100 mph
1994 25th ANNIVERSARY TRANS AM GT -1 of ONLY 2,000 made/ Only 128 made with a HURST 6-Speed Manual and 91 with T-Tops and Compact Disc/ K & N Filtercharger/Magnaflow Performance Muffler/Air Foil- ORIGINAL MINT Arctic White Ultra Rare SURVIVOR. DAYTONA 500 PACE CAR Decal Kit!
SOLD: 1989 Turbo T/A in 1991 it ran 12:18@115 mph
|

|

|
 10-04-2016, 03:20 PM
|
#25
|
|
Resident Camera Guy

Join Date: Aug 2004
Location: North Jersey
Posts: 10,971
|
__________________

|

|

|
 Posting Rules
|
You may not post new threads
You may not post replies
You may not post attachments
You may not edit your posts
HTML code is Off
|
|
|
|
|
|

